

A smokey eye makeup tutorial might look intimidating, but once you understand blending and placement, it becomes one of the easiest glam looks to master. Whether you want a soft smokey eye makeup for daytime or a dramatic night look, this guide will show you how to do smokey eye makeup step by step in a way that feels simple and achievable.
If you’re searching for an easy smokey eye makeup for beginners, you’re in the right place.
What Makes a Smokey Eye Different from Other Eye Makeup Looks?
Unlike a cut crease or sharp liner look, a classic smokey eye focuses on a smooth gradient. There are no harsh lines — only blended layers that create depth in the outer corner and along the lash line.
Key elements of a true smokey eye look:
- A transition shade for seamless blending
- Deeper color on the outer corner
- Smudged liner for softness
- A diffused lower lash line
- Balanced highlight on the inner corner
This blending technique is what gives the look its signature “smoky” finish.
Essential Tools You Actually Need (And Why They Matter)
Using the right tools makes a huge difference, especially if you’re learning how to blend smokey eyes properly.
- Eye primer to prevent creasing
- Fluffy blending brush + packing brush
- Neutral eyeshadow palette with browns, taupes, and black
- Waterproof eyeliner for smudging
- Volumizing mascara
The biggest mistake beginners make? Trying to create a dramatic eye makeup look without proper brushes.
How to Do Smokey Eye Makeup Step by Step
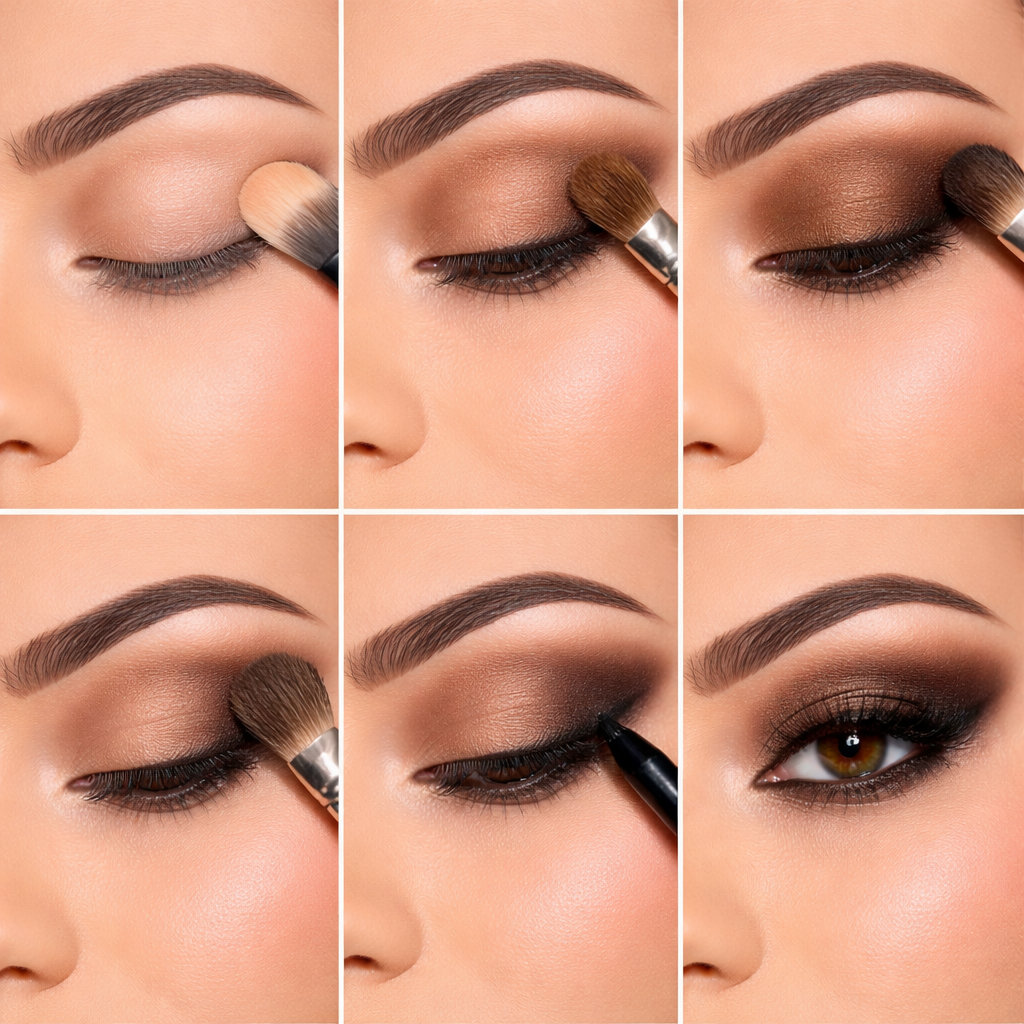
Step 1: Prep Your Lids
Apply primer evenly to avoid creasing and help your smokey eye makeup last longer. This also prevents fallout from sticking to your skin.
Step 2: Apply a Transition Shade
Choose a soft brown slightly darker than your skin tone. Blend it above the crease in circular motions. This creates the base for a soft glam smokey eye and prevents harsh lines.
If you prefer a brown smokey eye for daytime, this shade will already give subtle depth.
Step 3: Build Depth on the Outer Corner
Using a darker brown or black, apply color to the outer “V” of your eye. Pack first, then blend outward.
This technique works beautifully for:
- Smokey eye makeup for hooded eyes
- Smokey eye makeup for small eyes
- Evening glam looks
Remember: add product slowly. Too much at once causes the “raccoon eye” effect.
Step 4: Blend Like a Pro
Blending is what separates beginners from pros.
Tips:
- Use light pressure
- Blend in small circular motions
- Tap off excess powder
- Keep the darkest shade near the lash line
This is the secret behind a polished smokey eye makeup tutorial with pictures style finish.
Step 5: Define the Lash Line
Apply eyeliner along your upper lash line and gently smudge it. This step intensifies the look without making it harsh.
If you’re wondering about smokey eye without eyeliner, you can skip liner and deepen the lash line with shadow instead for a softer look.
Step 6: Highlight and Finish
Add shimmer or a light matte shade to the inner corner and brow bone. Finish with volumizing mascara to balance the depth.
Now you have a complete smokey eye step by step look.
Brown Smokey Eye vs Black Smokey Eye
Choosing colors depends on the occasion.
Brown Smokey Eye
- Perfect for daytime
- Softer and wearable
- Ideal for beginners
- Works beautifully for a quick smokey eye look under 10 minutes
Black Smokey Eye
- More dramatic
- Ideal for weddings or night events
- Popular in smokey eye makeup for wedding styles
If black feels too intense, try deep grey or plum for a softer variation.
Smokey Eye for Different Eye Shapes
One size does not fit all. Adjust placement depending on your eye shape.
- Hooded eyes: Keep depth slightly above the natural crease
- Small eyes: Avoid bringing dark shadow too far inward
- Round eyes: Elongate by blending outward
- Mature skin: Use more matte shades and lighter blending
This customization helps your easy smokey eye makeup look flattering, not overpowering.
Common Smokey Eye Mistakes (And How to Fix Them)
- Skipping transition shade
- Using too much black too quickly
- Not blending the lower lash line
- Ignoring fallout
- Forgetting to balance with mascara
A great tip? Do your eye makeup before foundation if you struggle with fallout.
Quick 10-Minute Smokey Eye Version
For busy days:
- Apply brown shadow all over lid
- Deepen outer corner slightly
- Smudge liner
- Add mascara
This simplified method creates a soft, wearable natural smokey eye look.
How to Make Your Smokey Eye Last All Night
Lock everything in with a setting spray.
This prevents smudging and keeps your glam eye makeup look fresh for hours.
Frequently Asked Questions
Can beginners really pull off a smokey eye?
Absolutely. Start with brown shades for an easy smokey eye makeup for beginners experience.
What colors work best besides black?
Brown, taupe, plum, bronze, and grey are beautiful alternatives.
How do you stop a smokey eye from looking messy?
Blend slowly, use a transition shade, and build color gradually.
Is brown better for daytime?
Yes. A brown smokey eye tutorial is softer and more wearable.
Final Thoughts
Learning how to do smokey eye makeup is all about placement and blending. Once you understand depth and gradient, you can customize the look for daytime, bridal glam, or dramatic night events.
Start soft. Build slowly. Blend patiently.