
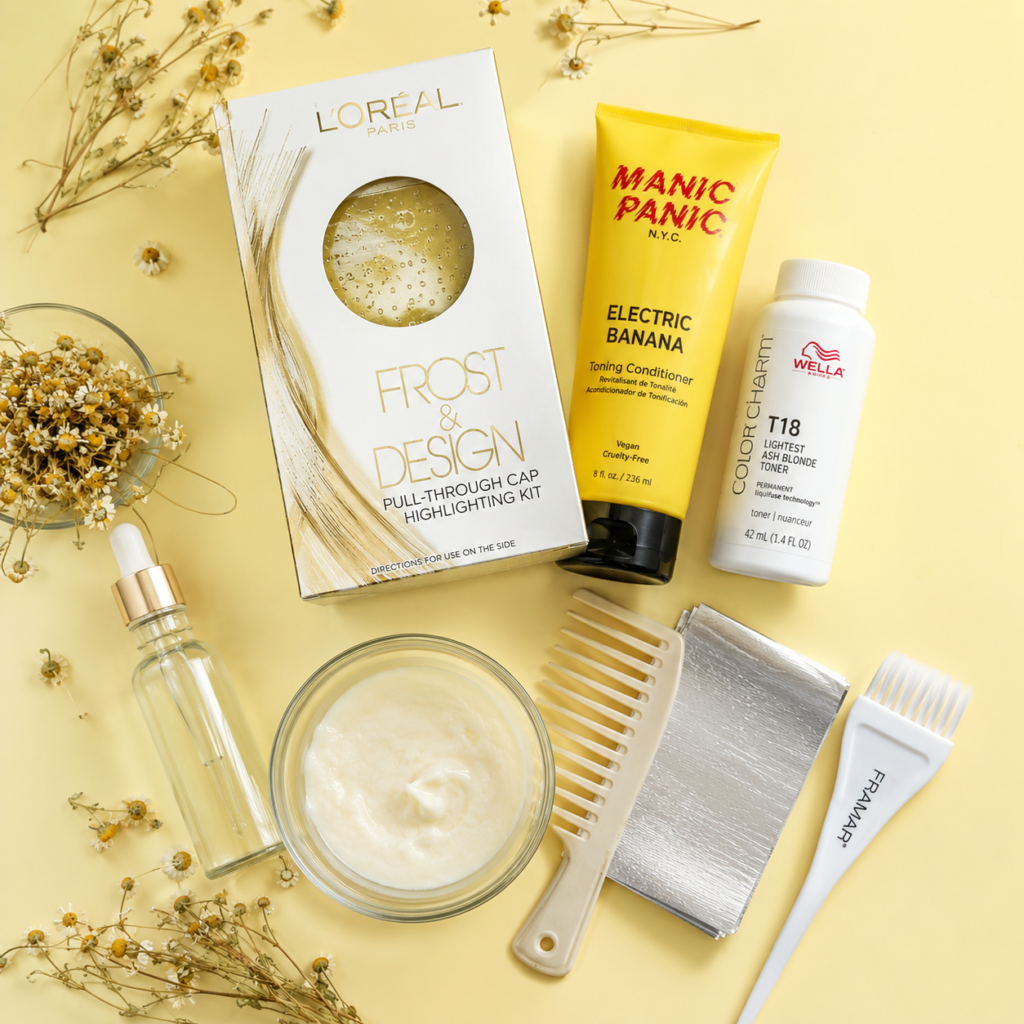
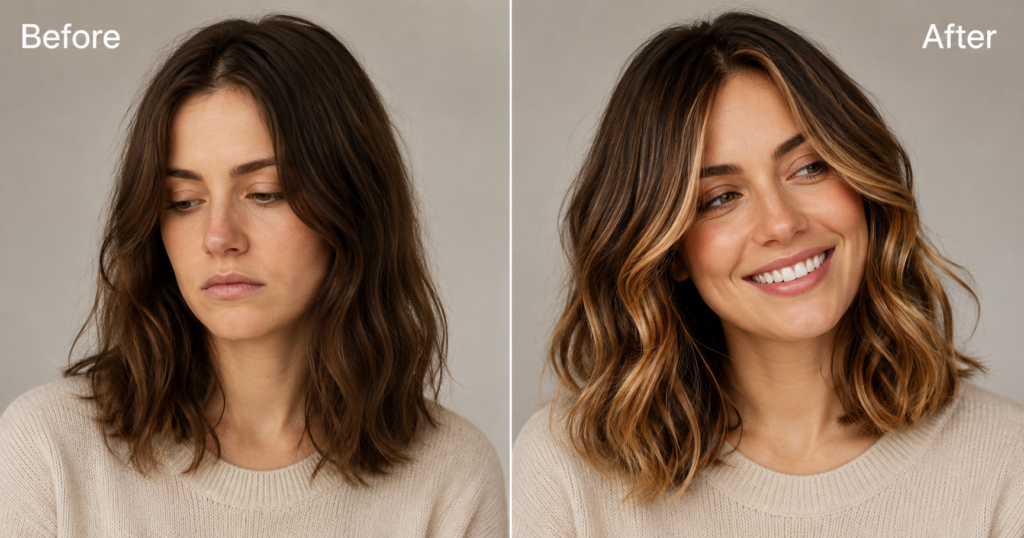
Here’s the deal, I’ve been highlighting my own hair for about six years, and my first attempt left me with three different shades of orange on one side of my head and a foil stuck to my ear. I’ve since learned a lot. Knowing how to highlight hair at home properly, meaning which developer strength to use, how to section correctly, and what toner to grab after, is the difference between a sun-kissed result and a full-on bleach disaster. The L’Oréal Frost & Design Pull-Through Cap Kit is honestly the most forgiving starting point for beginners, and it’s the one I recommend every single time.
How Highlighting Works
Let me look at the chemistry here, because it actually matters. Bleach powder mixed with a developer (hydrogen peroxide) breaks open the hair’s cuticle layer and oxidizes the melanin inside the cortex. That’s what removes color, not the bleach alone, but the chemical reaction between the two.
Developer comes in different volumes, 10, 20, 30, and 40. Higher volume means faster lift but also way more damage, especially from follicle to tip. For most at-home highlights, 20 volume is the sweet spot, enough lift on naturally medium-brown hair without cooking the ends.
The cuticle matters, too. Porous hair (think: already color-treated, heat-damaged, or fine) lifts faster and can turn yellow or orange before you even hit the shade you want. That’s where a toner saves everything.
Before and After: What to Expect
| Feature | Before (Common Mistake) | After (Optimized Approach) |
|---|---|---|
| Developer strength | Using 40 volume for “faster” results | Using 20 volume for controlled, even lift |
| Bleach placement | Applying from root to tip all at once | Starting mid-shaft, then pulling to ends last 10 minutes |
| Product choice | Box dye “highlight” kits with built-in metallic dye | Pure bleach powder plus separate 20-volume developer |
| Post-bleach step | Skipping toner, hoping brassy yellow fades | Applying Wella T18 toner for 20 to 30 minutes immediately after |
| Frequency | Highlighting again within 2 to 3 weeks because result looks off | Waiting 6 to 8 weeks minimum between lightening session |
The Protocol
Follow these steps in order. Skipping any one of them is usually how people end up with patchy or over-processed results.
- Do a strand test first. Cut a small piece from underneath, mix a tiny amount of your bleach-developer combo, and apply it. Check at 15, 25, and 35 minutes. This tells you exactly how fast your hair lifts, and I genuinely cannot stress this enough after my second attempt went brass in 12 minutes flat.
- Section your hair into four quadrants. Clip each section up. Work from the back first, then the sides, then the front face-framing pieces last, they process faster because of body heat.
- Mix bleach powder with 20-volume developer in a 1:2 ratio. Apply to mid-shaft first, wait 10 minutes, then pull down to the ends. Do the roots last, if at all, during the final five minutes. Roots always process fastest.
- Use the Framar Highlight Brush and Bowl Set for clean, precise application. A brush that’s too stiff drags hair and makes patchy streaks, the flexible bristles on Framar’s brush let you work with the hair instead of fighting it.
- Rinse with cool water until water runs completely clear. Then apply a toner like Wella T18 if you see any yellow or orange. Leave toner on for 20 to 25 minutes, not longer.
- Follow immediately with a bond-repairing treatment. Skip your regular conditioner this first wash. Your cuticle is wide open and needs protein and moisture, in that order.
Porosity Check: Know Your Hair Before You Bleach
Most people skip this, but it’s probably the most important diagnostic step before you go anywhere near a bleach bowl.
The Float Test: Drop a few clean, dry strands into a glass of room-temperature water. Wait two minutes.
- Sinks quickly → High porosity. Your hair absorbs and loses moisture fast. It will lift quickly and may go brassy fast. Use a lower developer (10 to 20 vol) and watch closely at the 15-minute mark.
- Floats in the middle → Medium porosity. The sweet spot for at-home highlights. 20-volume developer and standard processing time (25 to 35 minutes) usually works well.
- Stays at the top → Low porosity. Your cuticle resists everything, including bleach. You may need slightly longer processing or 30-volume developer, but only if your hair is in healthy condition.
Quick note: Color-treated, heat-damaged, or chemically relaxed hair almost always reads as high porosity even if it doesn’t look damaged. Treat it as such.
Drugstore Gems vs. Salon Standards
| Feature | Drugstore Pick | Salon Professional |
|---|---|---|
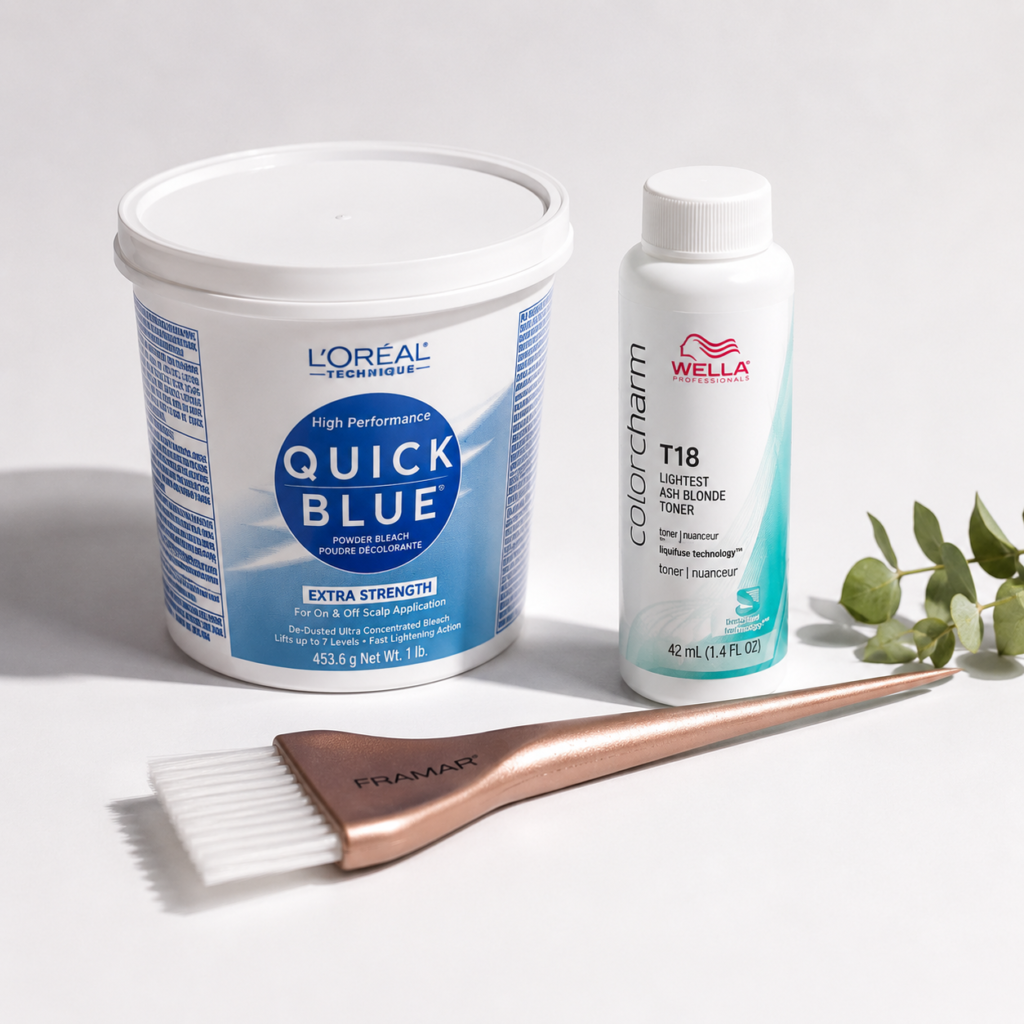
| Bleach powder | L’Oréal Quick Blue Powder Bleach (~$8) | Schwarzkopf BlondMe Premium Lift 9 (~$22) |
| Developer | Generic 20-volume cream developer (~$5) | Wella Welloxon Perfect 20-volume (~$14) |
| Toner | Shimmer Lights Purple Shampoo (used as toner) | Wella Color Charm T18 Lightest Ash Blonde Toner (~$10) |
| Application tool | Included kit brush (often too stiff) | Framar Leopard Balayage Brush set (~$16) |
| Bond protection | None typically included | Olaplex No. 1 Bond Multiplier (added to bleach bowl) |
| Result consistency | Variable, depends on hair condition | More predictable lift with less brassiness |
Honest opinion here that goes against what most beauty editors say: you don’t need salon-professional bleach powder to get a decent at-home result. The developer quality matters far more than the bleach brand. A good cream developer keeps the mixture the right consistency longer, which means more even coverage.
Frequently Asked Questions
How long should I leave bleach on my hair at home?
Check your strand test results first, that’s your real timer. Generally, 25 to 35 minutes tends to be the safe range for medium-brown hair using 20-volume developer. However, high-porosity or previously colored hair can lift in as little as 15 minutes. Check every five minutes after the 20-minute mark, and rinse the moment you hit your target shade.
Can I highlight hair at home if it’s already color-treated?
You can, but proceed carefully. Previously colored hair is usually more porous, which means it lifts faster and can go uneven or brassy quickly. I’d recommend using 10-volume developer, doing a thorough strand test, and keeping bleach away from any overlapping color until you know how the hair responds.
What toner should I use after highlighting at home?
Wella T18 is the one I return to consistently, I’ve been through about four bottles over the last two winters. For warm, golden tones, T14 or T11 tends to work better. Mix your chosen toner with 20-volume developer in a 1:2 ratio and leave on for 20 to 25 minutes. Purple toning shampoo is a maintenance step, not a substitute for an actual toner after bleaching.
How often can I highlight my hair at home?
Six to eight weeks minimum between sessions. Most importantly, your hair needs time to recover, every bleaching session raises the cuticle and removes protein. Repeated bleaching inside that window causes breakage that starts mid-shaft and snaps off. If your highlights look too grown out before six weeks, a root shadow gloss is a safer option.
The Amber Verdict
Highlighting hair at home is completely doable, but only if you respect the chemistry and build in real processing discipline, not just follow the box timer. If you want to learn how to highlight hair at home without frying it, my one standing rule after years of DIY highlighting is simple: always tone, never skip. And if you’re working with already-lightened ends, a 10-volume developer often delivers better results than 20 without the damage risk. Pin this before your next session so you’ve got the protocol right in front of you.